AutoFritz: Autocomplete for Prototyping Virtual Breadboard Circuits
Jo-Yu Lo, Da-Yuan Huang, Tzu-Sheng Kuo, Chen-Kuo Sun, Teddy Seyed, Jun Gong, Xing-Dong Yang, Bing-Yu Chen ACM Conference on Human Factors in Computing Systems (CHI), 2019. Honorable Mention Award [PDF] [Video]
Motivation
Designing and documenting breadboard circuits using software prototyping tools (e.g., Fritzing, VBB, and 123D Circuits) has become a common practice in the maker community and beyond, with these tools being heavily used by those without a strong electronics background. However, much of the existing software requires the circuit components to be manually added and connected by user, which can be error prone and time-consuming. Common hardware errors, such as missing components (e.g., not using a resistor with a LED) or miswiring, also occurs in the virtual world, and can lead to significant time and efforts from the users to debug.
In this paper, we introduce the concept of autocomplete, commonly seen in web search, text editing, and programming, to the construction of virtual breadboard circuits. With autocomplete, software provides the user with a list of suggested components based on the one that is newly inserted in a virtual breadboard by a user (Figure 1). The suggested components complete or extend the functionality of the inserted component to save the user’s time and reduce circuit error. For example, when a user inserts an LED into the virtual breadboard, the system suggests that a resistor can be used, whose absence may cause damage to the LED or an Arduino board. The user can ignore the suggestion or accept it, in which case, a resistor will be placed and connected automatically to the LED on the virtual breadboard. With this feature, it becomes less likely for a novice user to miss the resistor. A user does not have to spend time on searching and reading the datasheet schematic of a component to learn how it should be used properly with basic components like resistors or inductors, to function properly.
System Walkthrough
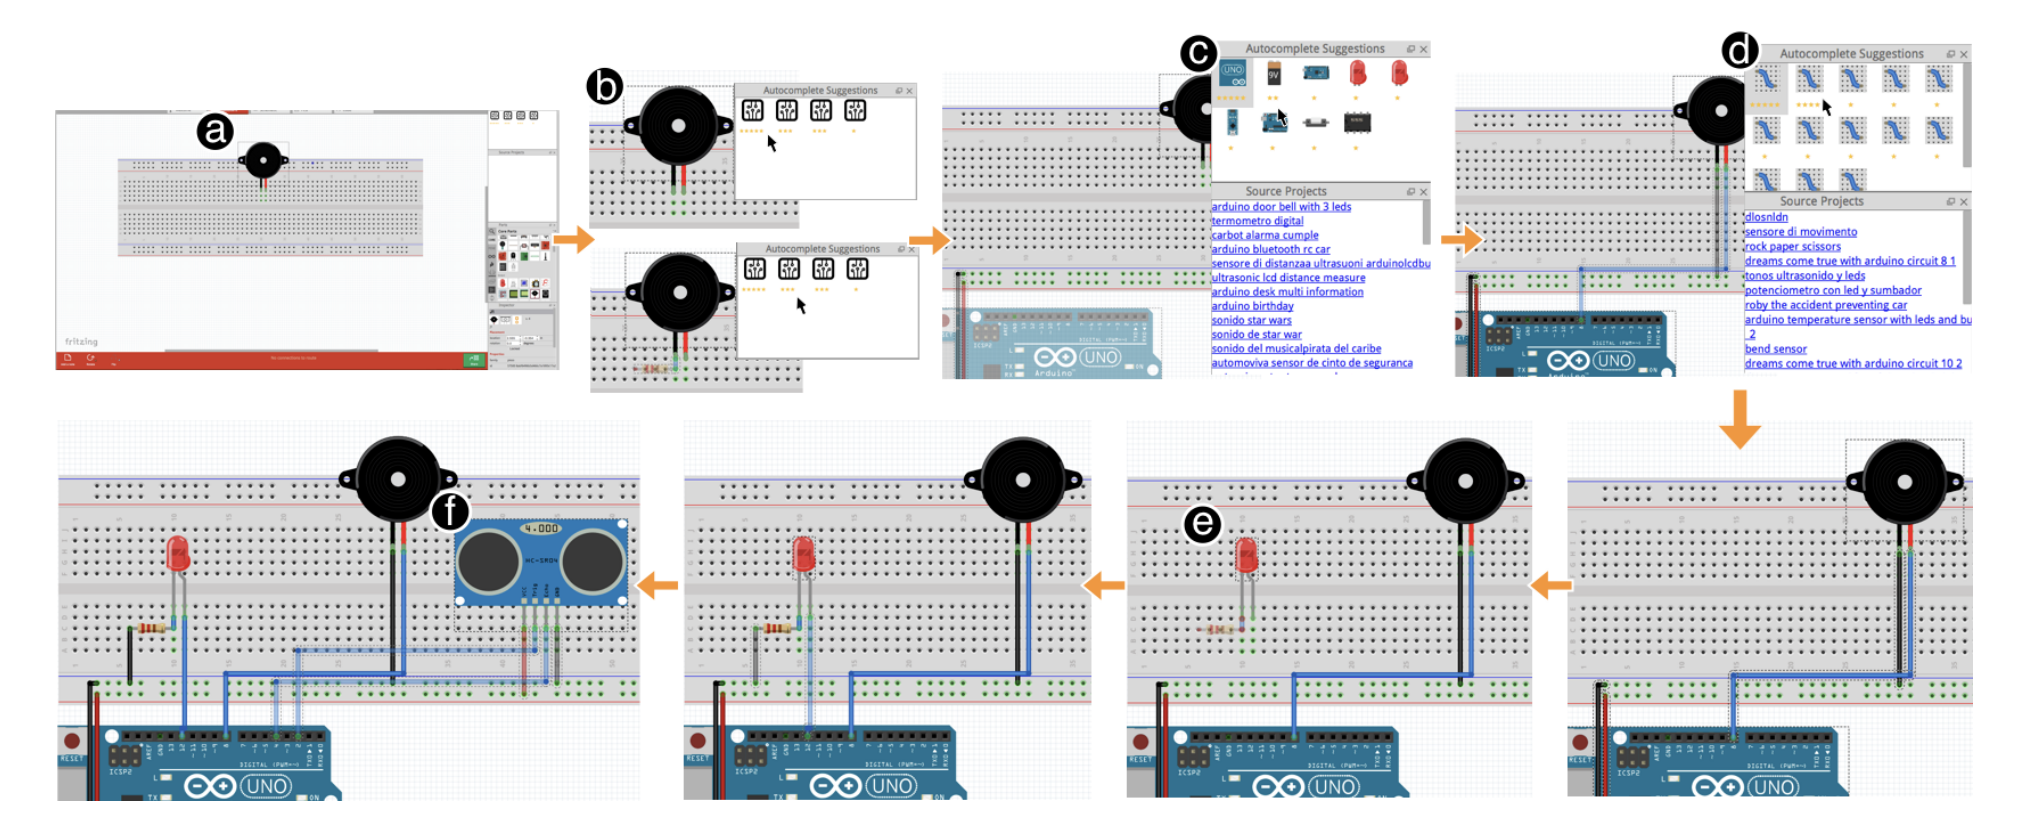
With AutoFritz, a user drags a piezo speaker component into the virtual breadboard (a).
Once the piezo speaker is added, AutoFritz shows a grid of four suggestion icons in the Suggestion Panel, each represents a different way to complete the speaker component to a speaker module (b). The suggestions are shown in a descending order from left to right (and up to down). Below each suggestion icon, the user finds a list of 1-5 stars, representing how frequently the suggested way of completing a module appears in the existing circuits in our database. For example, 5 stars indicates that the suggestion appeared in more than 40% of the circuits in the database. Four stars indicates the range between 30% to 40%, etcetera. The top-ranked suggestion is shown in the semi-transparent overlay on the breadboard. In this case, nothing is shown indicating that most people used the piezo speaker as a stand-alone module. If the user wants to further examine the suggestions, they can hover the cursor over a suggestion icon, which shows the suggested circuit in semi-transparent on the breadboard. The user finds that the first suggestion seems to be the one they need and click the icon to complete the module. Next, the system updates the suggestion panel to show the modules, MCUs, or batteries that are often used with the speaker module (c). The user can browse the icon images to have a brief idea of what component is suggested. She also places different suggestions on the breadboard to examine them closely. She undoes the unwanted elections. Finally, the user places the cursor over the first suggestion (e.g., Arduino Uno), and notices that in the Source Panel, there is a list of links that provides source projects, based on the suggestion. The user clicks the links and finds that they are all projects involving a speaker directly connected to the Arduino Uno. The user is now confident about their choice and selects the Uno for the piezo speaker. The system now updates the Suggestion Panel (d) to show varying ways of wire connections. The user selects one that seems viable for her circuit. Following a similar procedure, the user inserts the LED (e) and distance sensor modules (f). She connects them to the Arduino board by following AutoFritz’s suggestions.